Understanding Website Cookies and Implementing Cookie Consent in Next.js project.


Table of contents
- Prerequisites
- What are internet cookies?
- Where are cookies stored?
- What are cookies used for?
- Types of cookies
- What are cookie consent banners?
- How to add a Cookie consent banner to the next.js project
- Add cookie consent library
- How to set a cookie in the next.js project
- Retrieve a cookie and verify user's identity
- Conclusion
Over 80% of the total websites on the internet today have a cookie enabled. Also, almost everyone who surfs the web today has seen these little banners that pop up asking you to consent to the use of cookies on your browser. Website cookies play a pivotal role in enhancing user experiences and providing personalized content. However, the use of cookies also raises important questions about user privacy and data protection. To strike a balance between offering a seamless online experience and respecting user consent, web developers must comprehend the intricacies of website cookies and implement robust cookie consent mechanisms.
In this article, we will explore website cookies, their various types, and why obtaining user consent is important before storing cookies on their browser. We’ll also learn how to integrate a cookie consent banner in the next.js application and store a simple cookie on a user browser.
Prerequisites
Must know Javascript and the Next.js framework, as well as a coding environment like Node.js and a code editor such as VS Code. And, of course, a cup of coffee to keep you going! 🤣
What are internet cookies?
Cookies are small pieces of data sent to your browser by a website you visit. They help the website remember information about your visit, such as shopping cart, and preferences, and save information about each user’s session. which can make it easier to visit the site again and make the site more useful to you.
Where are cookies stored?
Cookies are stored on the user's browser with key-value pairs. The file cookies stored on the browser are typically called ‘Cookies’
What are cookies used for?
Websites use HTTP cookies to streamline your web experiences. Without cookies, you’d have to log in every time you leave a site or rebuild your shopping cart if you accidentally closed the page. Website cookies are an important part of the modern internet experience.
cookies are mostly intended for:
User sessions: The term session refers to the amount of time a user spends on a website, without authentication interruptions. Session cookies help associate website activity with a user. A session cookie contains a unique string (a combination of letters and numbers) that matches a user session with relevant data and content for that user.
Without this session cookie, each time you load a new page on a website, you will be required to log in again, even if you previously logged in.Personalization: Cookies help a website to personalize user browsing experience. Cookies can be used to remember information about the user to show relevant content to that user over time. For example, a web server might send a cookie containing the user name that was last used to log into a website, so that it may be filled in automatically the next time the user logs in.
Tracking: Shopping sites use cookies to track items users previously viewed, allowing the sites to suggest other goods they might like and keep items in shopping carts while they continue shopping on another part of the website.
Types of cookies
Below are a few variations of cookies:
Session cookie: A session cookie helps a website track a user’s session. Session cookies are deleted after a user’s session ends — once they log out of their account on a website or exit the website. Session cookies have no expiration date, which signifies to the browser that they should be deleted once the session is over.
Authentication cookie: This type of cookie is generated on successful login to a website. This cookie contains pieces of information about the logged-in user. This information is sent to the server on each request the user makes while using the website.
Persistent cookie: Unlike session cookies, persistent cookies remain in a user’s browser for a predetermined length of time, which could be a day, a week, several months, or even years. Persistent cookies always contain an expiration date.
What are cookie consent banners?
Cookie consent banners, often called cookie consent pop-ups or cookie notifications, are user interface elements on websites when users first visit them. These banners inform visitors that the website uses cookies to enhance their browser experience, collect data, and request the user’s consent to do so.
How to add a Cookie consent banner to the next.js project
If you want to add a consent banner to your next.js project, start by creating a new project. Head to your document folder on your computer and create a new folder named “my-next-app”. If you are adding to an existing project, you can skip this step. After creating the folder, open it in your code editor (such as vscode). Right-click on the folder and choose “Open with vscode”.
Then, open the built-in terminal in vscode and run the following command:
npx create-next-app .
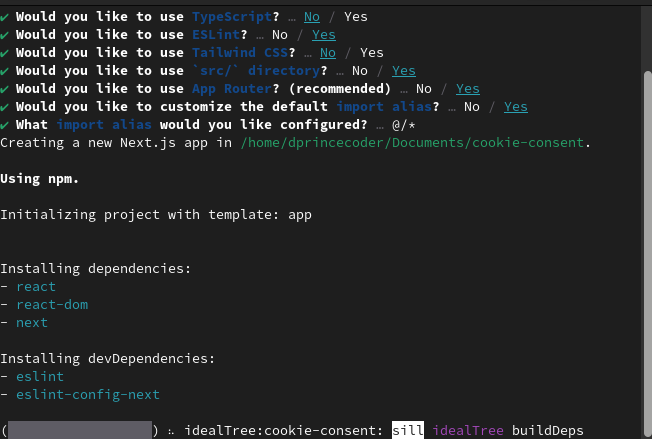
Next, Select the preferences you want in the next.js app
Next, start the new project:
npm run dev
This will start a local development server, and you can access your Next.js app by opening a web browser and navigating to http://localhost:3000.
Add cookie consent library
Cookie consent banners are HTML interfaces users see and confirm their consent for the website to collect data and personalize their browsing experience. This banner comes in different forms and design to match the website skin. However, for the sake of this tutorial, we will use this 'react-cookie-consent' library. Additionally, to set a cookie or retrieve a cookie, we will use the cookies-next library
Open the vscode terminal and install the two libraries:
npm install react-cookie-consent cookies-next
# or
yarn add react-cookie-consent cookies-next
Next, create a new file called CookieConsentBanner.js and paste the below code:
// components/CookieConsentBanner.js
import React from 'react';
import CookieConsent from 'react-cookie-consent';

const CookieConsentBanner = () => {
  return (
    <CookieConsent
      location="bottom"
      buttonText="I Understand"
      cookieName="myCookieConsent"
      style={{ background: '#333', color: '#fff' }}
    >
      This website uses cookies to enhance user experience.
    </CookieConsent>
  );
};

export default CookieConsentBanner;
Customize the component to match your application’s design.
Next, remove boilerplate code from page.js, create your application layout, and include the CookieConsent component.
import CookieConsentBanner from "./component/CookieConsent";
import styles from "./page.module.css";

export default function Home() {
  return (
    <main className={styles.main}>
        <header>
          <h1>Hello Welcome to my cookie website</h1>
        </header>
        <footer>{/* Your footer content */}</footer>
        <CookieConsentBanner />
    </main>
  );
}
When you use the code snippet provided, the web browser will display the following content:
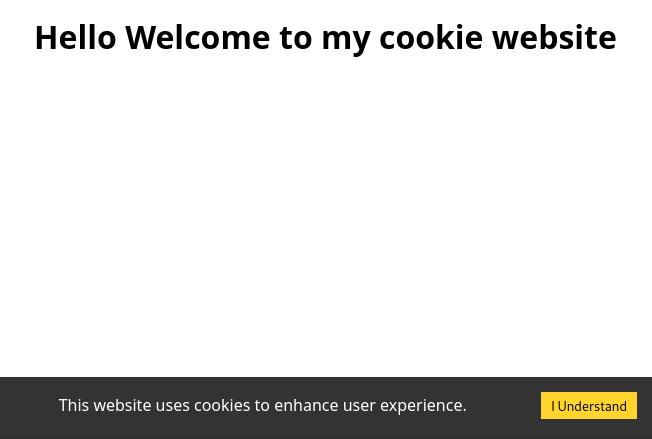
cookie consent example
How to set a cookie in the next.js project
Cookies are small key-value pairs of text files that store information on the user’s browser. To store cookies on the browser, you must provide both a key and a value.
To set a cookie, simply add an extra parameter called onAccept to the CookieConsentBanner component and pass in a handleAccept function. This function will be triggered once the user agrees to the cookie consent.
import setCookie from 'cookies-next'
import CookieConsent from "react-cookie-consent";

const CookieConsentBanner = () => {
  const handleAccept = () => {
    setCookie("myCookieName", "myCookieValue", {
      maxAge: 60 * 60 * 24 * 7, // Set expiration (1 week)
      path: "/", // Cookie path (optional)
    });
  };
  return (
    <CookieConsent
      location="bottom"
      buttonText="I Understand"
      cookieName="myCookieConsent"
      style={{ background: "#333", color: "#fff" }}
      onAccept={handleAccept}
    >
      This website uses cookies to enhance user experience.
    </CookieConsent>
  );
};

export default CookieConsentBanner;
The above code snippet will save a cookie to the user’s browser with the provided values. Open your browser’s developer tool, refresh the page, then accept the cookie consent, you can see the result of the cookie in the Cookies tab.
Retrieve a cookie and verify user's identity
For each request made to a server, the browser always sends along a given cookie for the request. If this cookie is no longer valid, the server responds with an error message, indicating an expired or invalid cookie.
To retrieve the cookie you just set, import Cookies from the react-cookie-consent package:
import setCookie from 'cookies-next'
import CookieConsent, {Cookies} from "react-cookie-consent";

const CookieConsentBanner = () => {
// Parse cookies from the request or browser
const cookie = Cookies.get("myCookieName");
  console.log(cookie); // myCookieValue

  const handleAccept = () => {
    setCookie("myCookieName", "myCookieValue", {
      maxAge: 60 * 60 * 24 * 7, // Set expiration (1 week)
      path: "/", // Cookie path (optional)
    });
  };
  return (
    <CookieConsent
      location="bottom"
      buttonText="I Understand"
      cookieName="myCookieConsent"
      style={{ background: "#333", color: "#fff" }}
      onAccept={handleAccept}
    >
      This website uses cookies to enhance user experience.
    </CookieConsent>
  );
};

export default CookieConsentBanner;
Conclusion
Websites rely on cookies to enhance the browsing experience, track activities, and suggest relevant ads to users. The react-cookie-consent package enables obtaining users’ consent before setting cookies on their browsers. It is important to prioritize user privacy and always seek their permission before collecting their data.
Hurray! That’s a wrap, drop your feedback in the comments. Follow me for more stories.