How to use Appwrite as a backend service: Buiding a chat app with Appwrite

As a versatile front-end developer, I specialize in translating UI/UX wireframes into captivating web applications using JavaScript, frameworks, and libraries. I work collaboratively with backend teams to ensure the creation of stellar finished products.
In addition to my development expertise, I am a skilled technical writer. I have a passion for conveying complex concepts in a clear and concise manner, making them accessible to diverse audiences. Whether it's crafting engaging articles, comprehensive tutorials, or precise documentation, my goal is to provide informative and easily understandable content.
Introduction
Since the internet's emergence, users have had to engage with an interface to complete various tasks. This internet architecture is mainly divided into two formats: the front end and the back end. The front-end developers write the code that determines what users see and interact with, including color, typography, and more. Additionally, back-end developers create the logic that enables the web to perform server actions, such as adding users to the database. However, many projects do not require a lot of back-end logic, and hiring a back-end developer or writing back-end logic can be time-consuming. That's where Appwrite comes in to simplify the process.
In this article, we will explore what Appwrite is, and why you should consider it in your next web project, In the end, we will build a simple web chat app leveraging Appwrite services.
Prerequisites
This article expects you to have prior experience in HTML, CSS, JavaScript, and ReactJs framework.
Have a coding environment setup such as having NodeJS installed and a code editor.
Backend as a service
Backend as a service (BaaS) allows developers to focus on the front end of their applications and leverage backend services without maintaining them.
BaaS is a cloud service model in which developers outsource all-the-scenes aspects of a web or mobile application so that they have to write and maintain the front end.
BaaS providers provide pre-written software for activities that take place in services such as
User authentication
Database management
Storage handling
Updating
Push notification
What is Appwrite
Appwrite is a backend-as-a-service (BaaS) platform that is open-source and designed for web, mobile, and flutter applications. It has been optimized for developer experience and developed in collaboration with the open-source community.
Developers have complete control over their data and infrastructure because Appwrite is a self-hosted platform. For those who do not want to self-host, there is also a hosted version available that is a good option.
Appwrite features
Appwrite offers valuable backend services that simplify the integration of web applications.
Authentication: Securely login and authenticate users in your web app using Appwrite's authentication feature.
Database: Store, query and manage access to your app data in real-time with a robust and scalable database.
Storage: Store and serve media files in your web app using the Appwrite storage S3 bucket feature.
Functions: You can create your personalized server logic and make use of Appwrite's cloud functions to simplify serverless functions that can scale.
Security and Privacy: Built-in SSL certificates, and encryption.
Realtime: A real-time database for fast and instant data communication.
Benefits of using Appwrite
Open-source: Appwrite is open-source, which means is free to use and modify.
Secure: Appwrite is built with security in mind. All data is encrypted and in transit.
Scalable: Appwrite is scalable, so you easily add data without having to worry about performance.
Flexible: Appwrite is flexible, developers can build robust web or mobile apps leveraging the backend services.
Getting started with Appwrite
Now that you have understood what Appwrite is and some of the benefits of using Appwrite, let's go ahead and add it to our project.
to use Appwrite services, go to Sign for Free Appwrite account and create a free account.
After creating an account, you will see your appwrite dashboard.
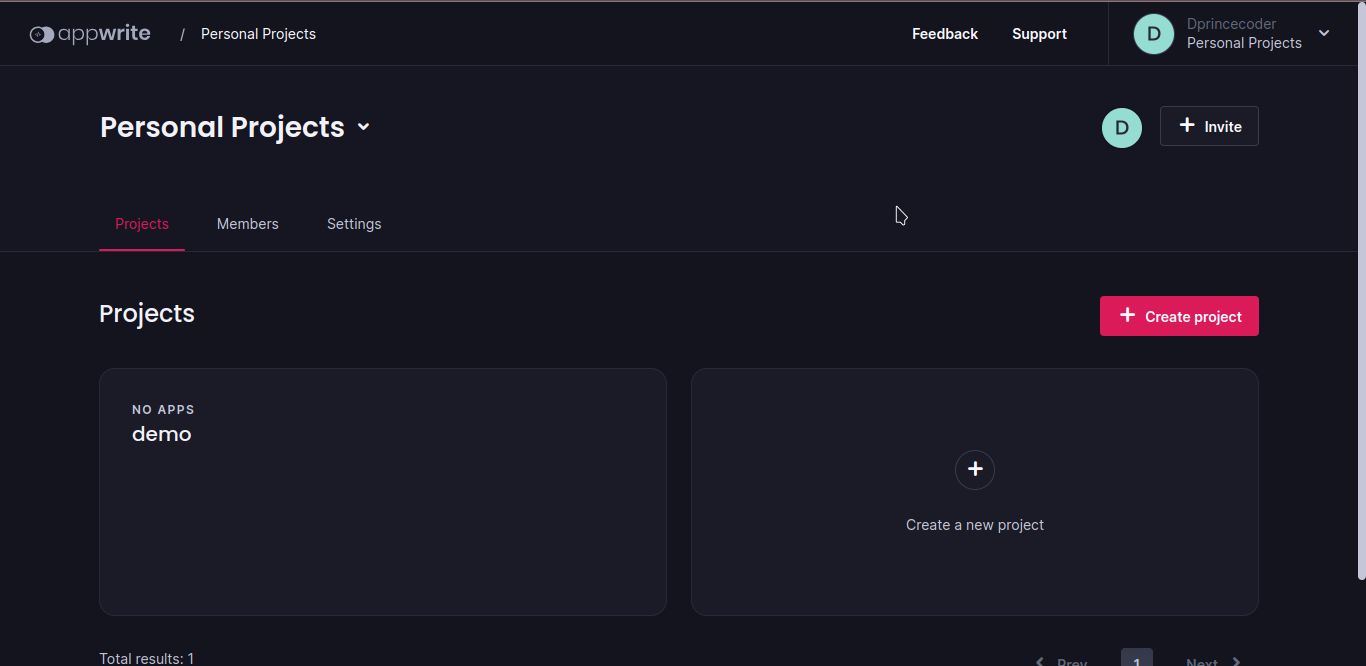
Next, click on the Create New Project button to begin the new project wizard.
Give your project a name, and your project will be created taking you to that project dashboard.
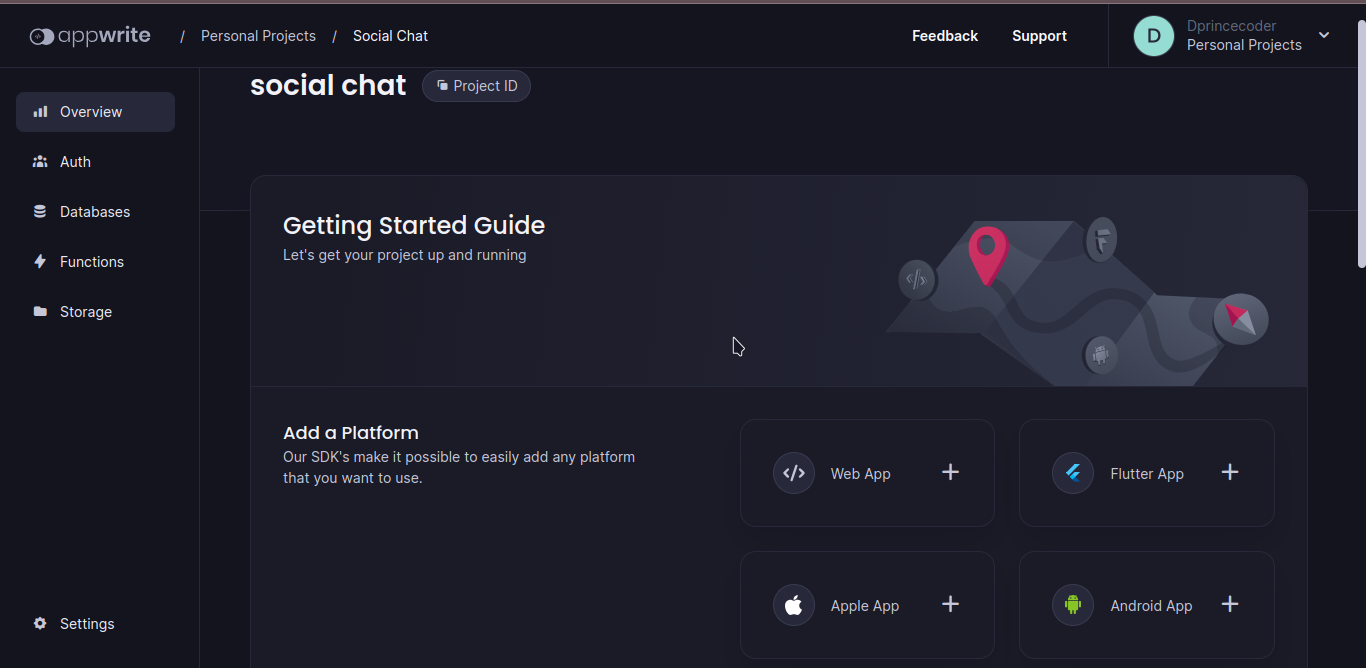
Next, choose an SDK method. Appwrite provides different SDKs for projects such as Web, mobile, Flutter, Apple, and Android. In our case choose the Web SDK.

Provide a name and the hostname for the domain your project will be served.
Setup React Project
In this section, create a new react project using Vite. Vite is now the recommended method way of creating react projects, Read more here Why Vite over CRA
npm create vite@latest
You'll be prompted to select a framework and a variant(template). In our case, we'll be using React, so select React and install the packages.
npm install
Setting up pages and file structure
I will be focusing on the Appwrite logic so that I won't write CSS and much JSX. Get the project code here code
Next, Install Appwrite
npm install appwrite
Create Appwrite instance
In your project folder create a new file called appwriteConfig.js, then paste the configuration code from your Appwrite SDK
import { Client } from 'appwrite';

const client = new Client()
    .setEndpoint('https://cloud.appwrite.io/v1')
    .setProject('64e5e6f0d9fdb10caf53');
NOTE: Remember to hide your Appwrite project security keys in a real project, as this may set a security threat to your Appwrite account if exposed.
Next export the Appwrite config file.
export default client;
User authentication with Appwrite
The process of authentication involves confirming the accuracy of a user's information before allowing them to access sensitive data. It is a fundamental aspect of application security.
Appwrite provides a BaaS service for authenticating users called Account API.
The account API allows us to authenticate and manage users' accounts and sessions. In this tutorial, we will utilize the create email session endpoint.
To use the Account API, open your AppwriteConfig.js file, and initialize an instance.
import { Client, Account } from 'appwrite';
const client = new Client()
    .setEndpoint('https://cloud.appwrite.io/v1')
    .setProject('64e5e6f0d9fdb10caf53');

export const account = new Account(client);

export default client;
In the above code snippet, we import the Account method from Appwrite, then we export an account variable and initialize the account instance by passing in our project credentials.
Login and Register pages
Open your pages folder and create two files namely, Login.jsx and Register.jsx. Additionally, open your Register.jsx and paste the below code.
import React from 'react'
import {useState} from 'react'
import { Link } from 'react-router-dom'

const RegisterPage = () => {

    const [credentials, setCredentials] = useState({name:'',email:'', password1:'', password2:''})

    const {handleRegister} = useAuth()


    const handleInputChange = (e) => {
        let name = e.target.name
        let value = e.target.value

        setCredentials({...credentials, [name]:value})
        // console.log('CREDS:', credentials)
      }

  return (
    <div className="auth--container">
      <div className="form--wrapper">

        <form onSubmit={(e) => }>
          <div className="field--wrapper">
                <label>Name:</label>
                <input
                  required
                  type="text"
                  name="name"
                  value={credentials.name}
                  placeholder="Enter your name..."
                  onChange={(e) => {handleInputChange(e)}}
                />
            </div>

            <div className="field--wrapper">
                <label>Email:</label>
                <input
                  required
                  type="email"
                  name="email"
                  placeholder="Enter your email..."
                  value={credentials.email}
                  onChange={(e) => {handleInputChange(e)}}
                />
            </div>

            <div className="field--wrapper">
                <label>Password:</label>
                <input
                  required
                  type="password"
                  name="password1"
                  placeholder="Enter a password..."
                  value={credentials.password1}
                  onChange={(e) => {handleInputChange(e)}}
                />
            </div>

            <div className="field--wrapper">
                <label>Confirm password:</label>
                <input
                  required
                  type="password"
                  name="password2"
                  placeholder="Comfirm your password..."
                  value={credentials.password2}
                  onChange={(e) => {handleInputChange(e)}}
                />
            </div>

            <div className="field--wrapper">
                <input className="btn btn--lg btn--main" type="submit" value="Register"/>
            </div>
        </form>

        <p>Already have an account? Login <Link to="/login">here</Link></p>
      </div>
    </div>
  )
}

export default RegisterPage;
With the above JSX code, we are ready to integrate Appwrite create email session endpoint
import {ID} from 'appwrite'
import {account} from '../appwriteConfig'

const handleSubmit = async (e) => {
e.preventDefault()
// handle validations
try{
            let response = await account.create(ID.unique(), credentials.email, credentials.password1, credentials.name);
            console.log('User registered!', response)

            await account.createEmailSession(credentials.email, credentials.password1)
            navigate('/')
        }catch(error){
            console.error(error)
        }
}


return (
    <div className="auth--container">
      <div className="form--wrapper">

        <form onSubmit={handleSubmit}>
            // inputs here
        </form>
    </div>
  )
In the above code snippet, we start by importing the ID from appwrite, The ID class allows us to generate unique IDs for the user. Additionally, we import the account instance from our appwriteConfig file.
Within the handleSubmit function, we prevent the page from refreshing when users try to submit the form, and then we call the create method in the account instance from appwrite and pass our user credentials. Lastly, we hook up our function to the form submit property.
Appwrite Auth dashboard
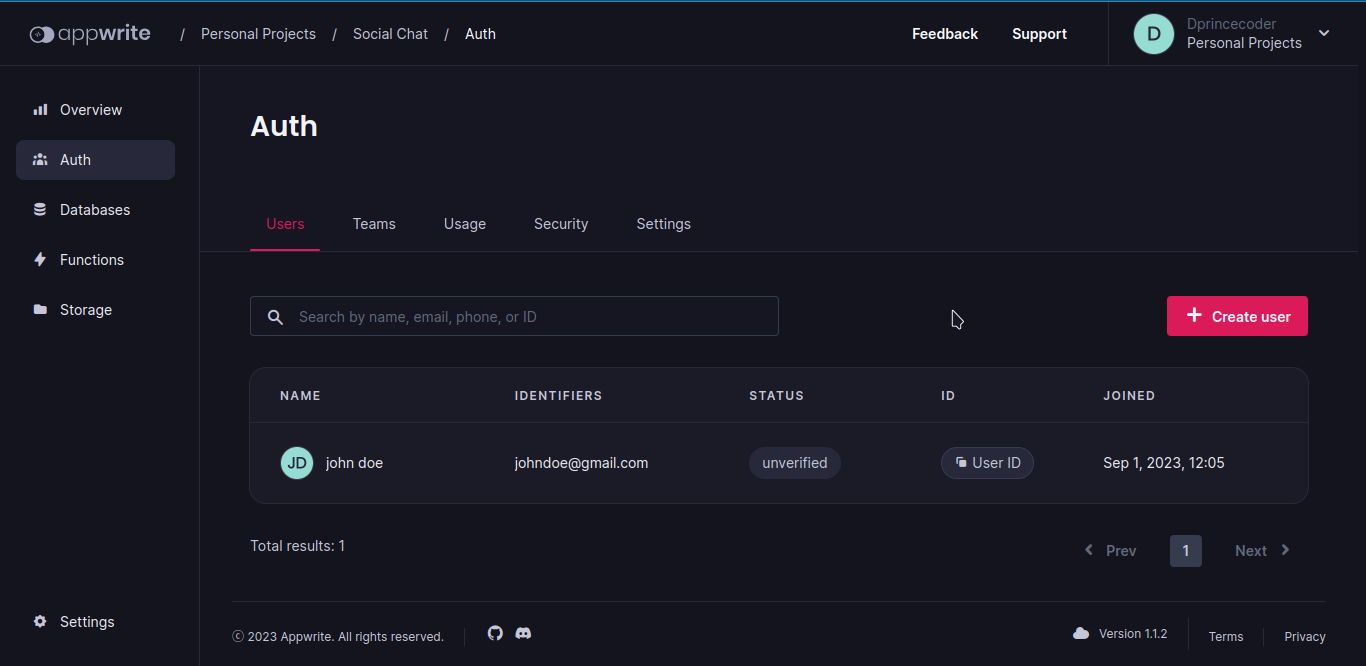
In your Appwrite dashboard, in the Auth tab, you will see a list of all authenticated users in your project. This auth dashboard view, allows you to view and manage users, such as changing user passwords.
If you performed the above code correctly and registered a user, then in your auth dashboard, you can see the new authenticated user.
Login user using Appwrite Authentication
The steps to login users into our project using Appwrite is similar to that of registering user. We have to utilize an additional method from the account API
import React, {useEffect, useState} from 'react'
import { useAuth } from '../utils/AuthContext'
import { useNavigate } from 'react-router'
import { Link } from 'react-router-dom'
import '../index.css'


const LoginPage = () => {
    const [credentials, setCredentials] = useState({email:"", password:""})

    const navigate = useNavigate()

    const handleInputChange = (e) => {
      let name = e.target.name
      let value = e.target.value

      setCredentials({...credentials, [name]:value})
      // console.log('CREDS:', credentials)
    }

 const handleUserLogin = async (e) => {
        e.preventDefault()
        console.log('CREDS:', credentials)

        try{
            let response = await account.createEmailSession(credentials.email, credentials.password)
            let accountDetails = await account.get();
            navigate('/')
        }catch(error){
            console.error(error)
        }
    }

 return (
    <div className="auth--container">
      <div className="form--wrapper">

        <form onSubmit={handleUserLogin}>
            // inputs here
        </form>
    </div>
}

export default LoginPage
In the above code snippets, after creating the user, we then call the get method, this allows Appwrite to fetch user information and populate the user session and information.
Appwrite databases
Appwrite uses a NOSQL database and JSON REST API for data querying.
Data in a database is organized into collections, which group similar information. For instance, in a social media application, users would be stored in a collection named users, while posts and comments would be stored in their respective collections.
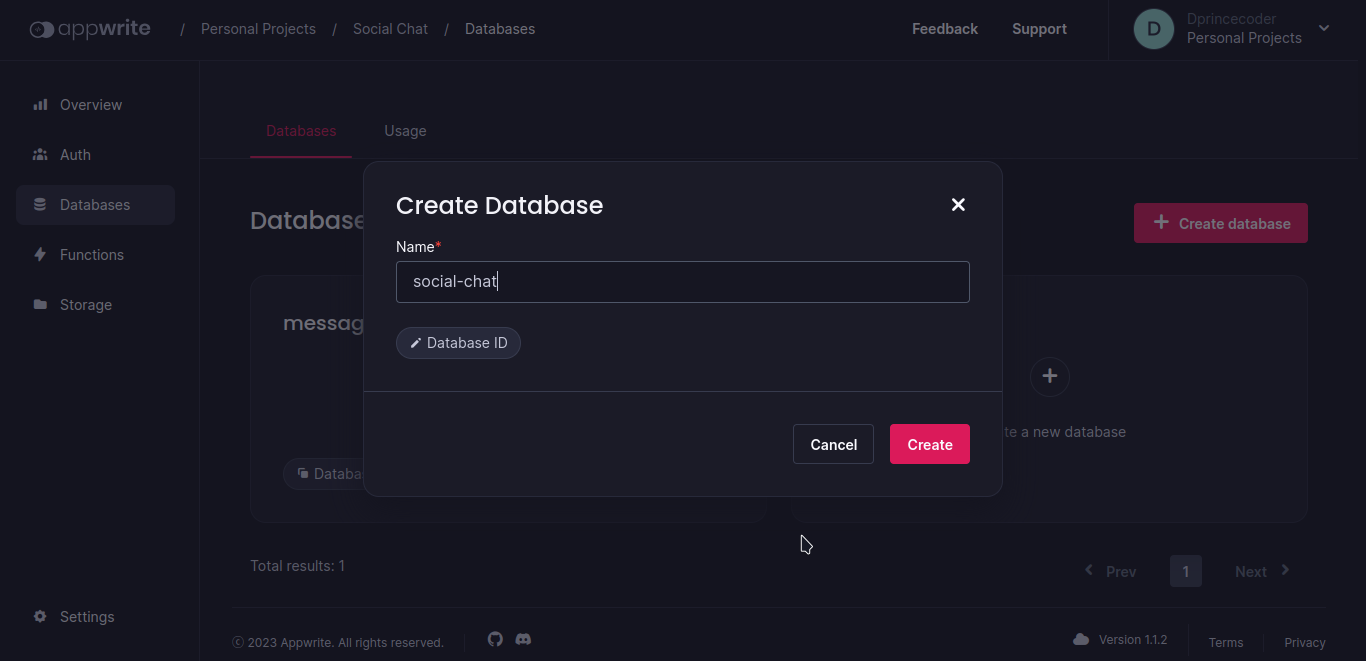
How to create a database in Appwrite
Go to your Appwrite dashboard, click on the database tab from the sidebar, and then click on the Create Database button
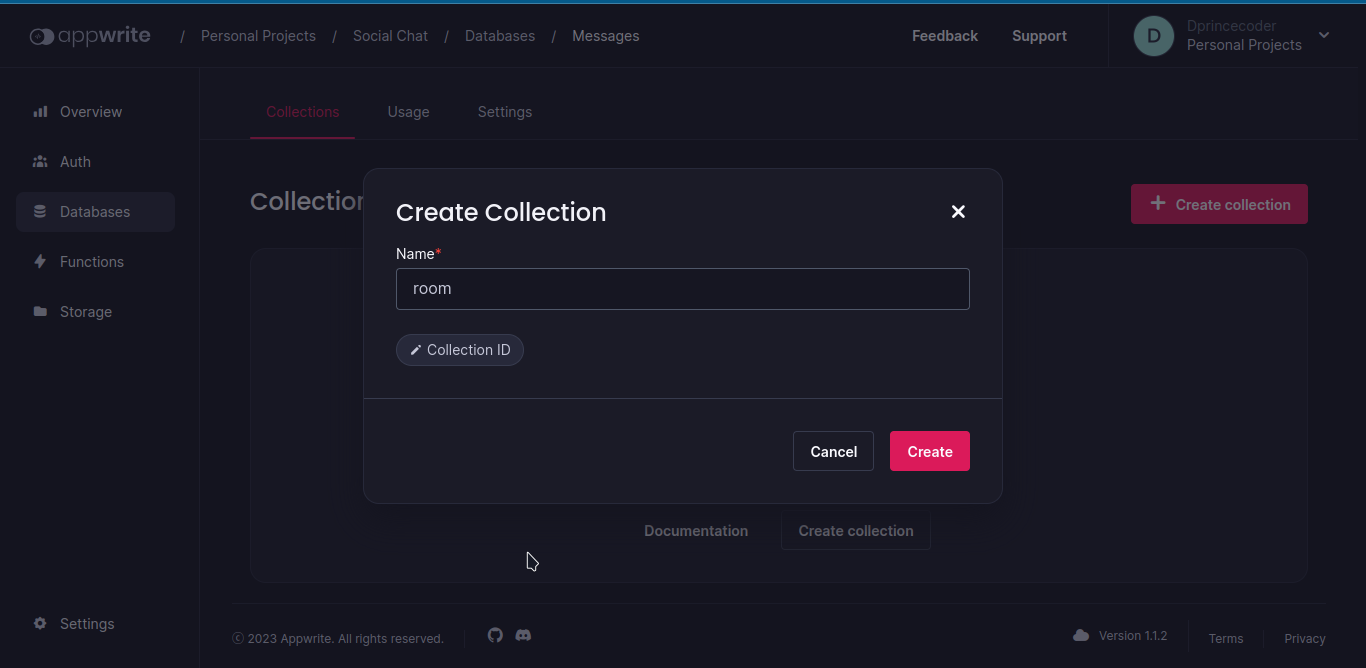
Create a collection
To store data in the database you just created, the information has to be stored inside a specific collection. Click on the Create Collection button to create a room collection where our chat messages will be stored.
Give the collection a name and save.
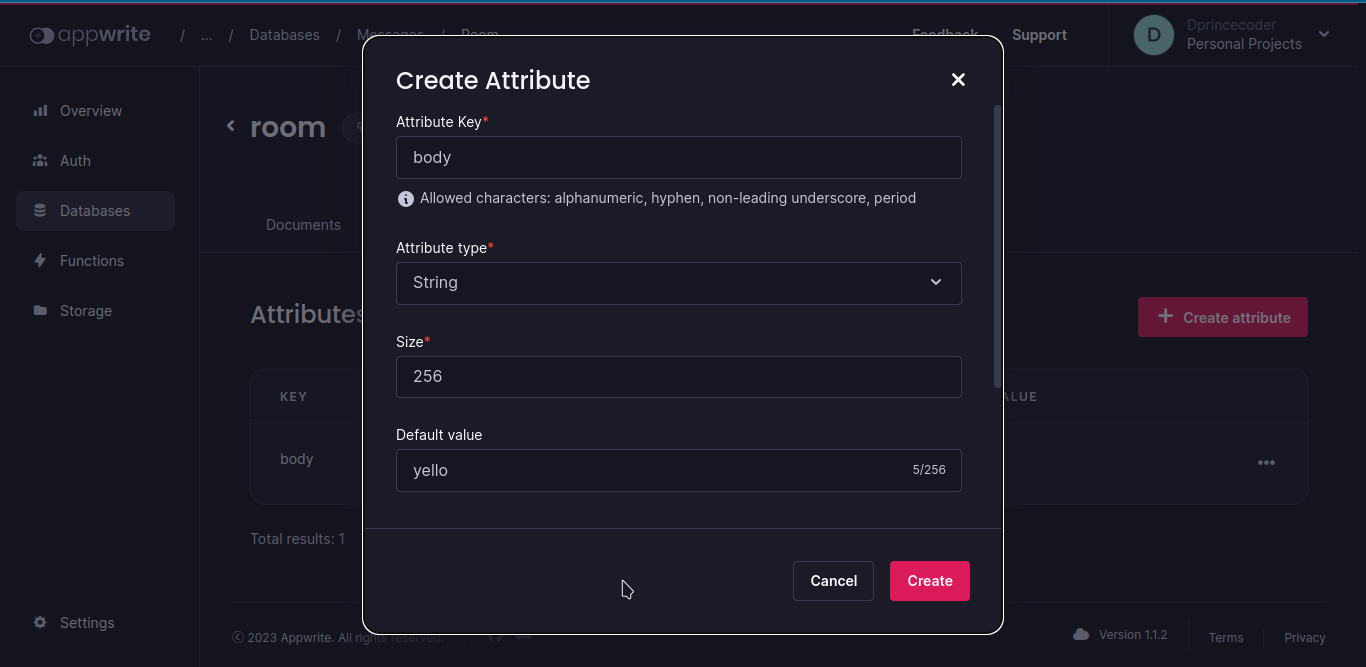
Each collection stores specific documents in a specific data type. These data types are grouped under attributes.
Create a new attribute body, this will hold the message a user sent in our application.
Appwrite database permission
Permissions allow users to perform certain activities within an application. Permission in the Appwrite database is assigned to roles that can be assigned to users.
Roles are a powerful feature used to make the management of permissions much easier. A “role” is simply a list of users who will have the same permissions for certain objects in the database.
Appwrite provides the following list of roles to a database collection:
any: Allows any user to connect and query the DB.
all users: All users can query the db.
all guests: only guest accounts can query the DB.
select users: Choose the specific users that can query the DB.
custom permission: Set your custom database permissions that apply to your database.
These permission roles perform CREATE, READ, UPDATE, AND DELETE operations on a database collection.
To enable and set permission on the room database collection we created earlier. Click on the settings tab under the collection dashboard.
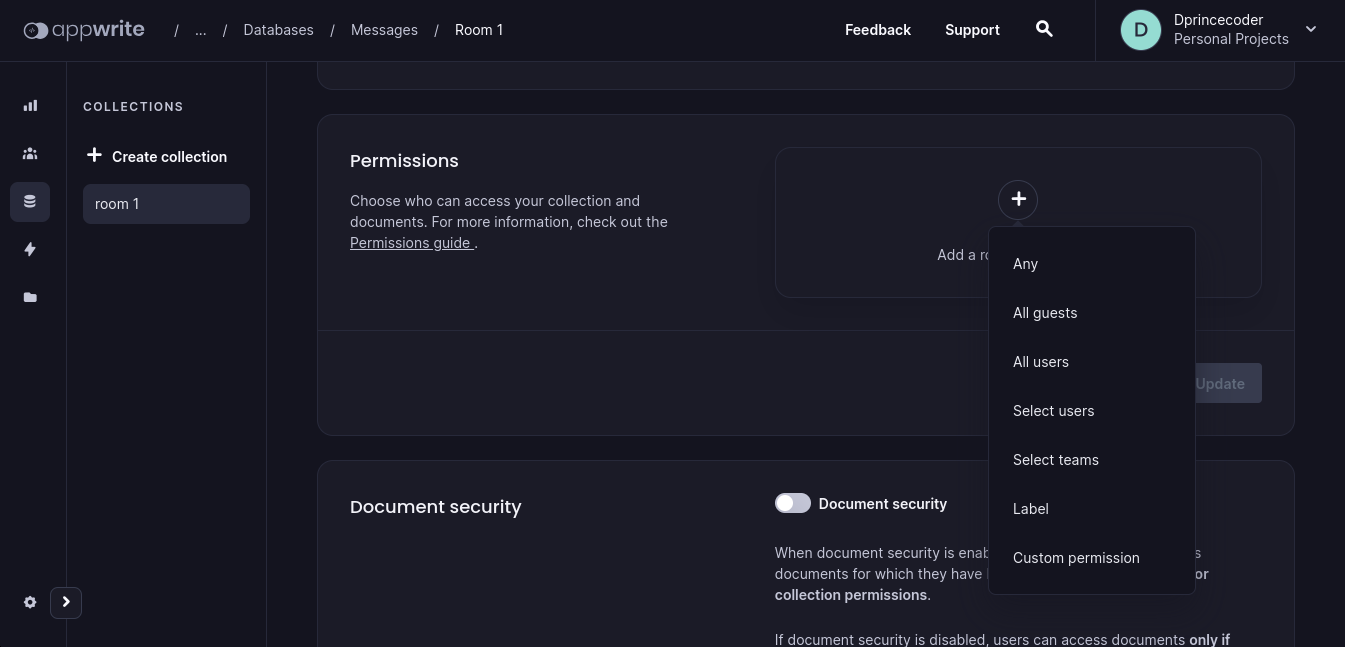
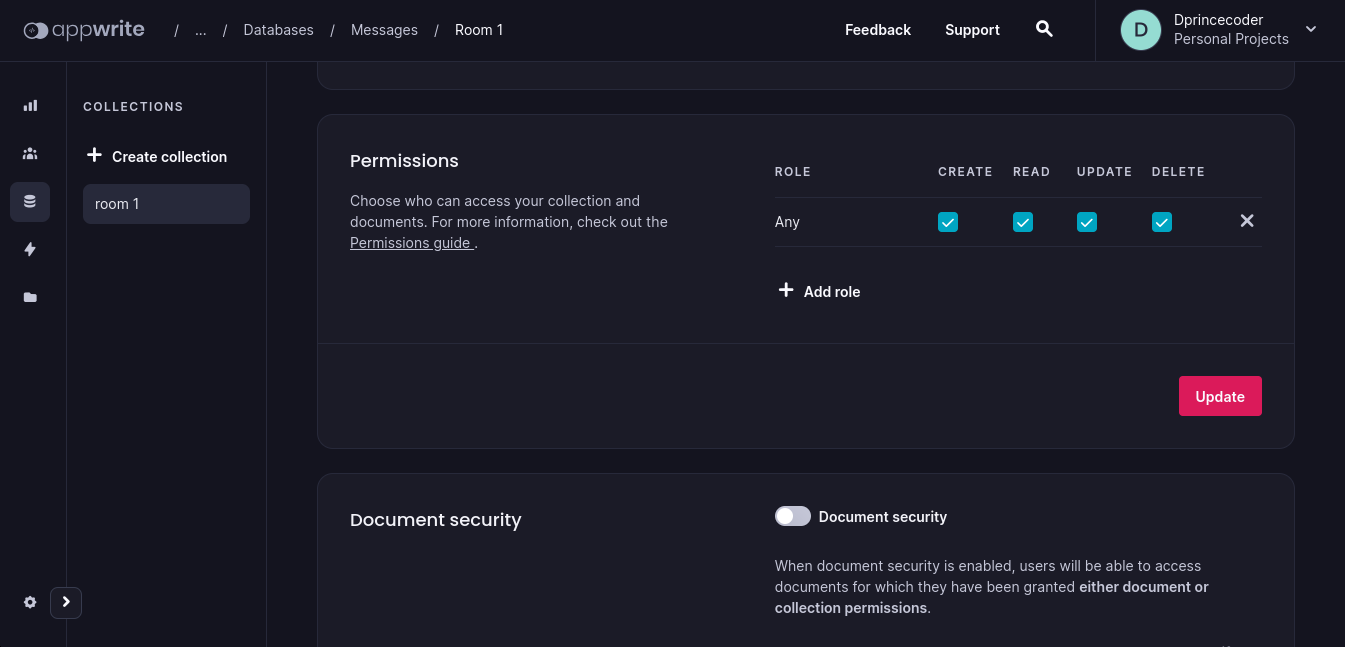
Select the role you want to assign to your collection and select the operations that can be performed.
How to fetch data from Appwrite database collection
Appwrite provides a unique way to list the data in project databases.
According to the official Appwrite docs
Using the listDocuments method of database API, we can fetch available user messages in our room collection.
Open the Room.jsx file and paste below code snippet
import React, {useState, useEffect} from 'react'
import client, { databases } from '../appwriteConfig'
import Header from '../components/Header';
import { useAuth } from '../utils/AuthContext';
import {Trash2} from 'react-feather'


const Room = () => {
    const [messageBody, setMessageBody] = useState('')
    const [messages, setMessages] = useState([])

  const getMessages = async () => {
        const response = await databases.listDocuments(
            databases.id,
            databases.collection.id,
            [
                Query.orderDesc('$createdAt'),
                Query.limit(100),
            ]
        )
        console.log(response.documents)
        setMessages(response.documents)
    }

useEffect(() => {
    getMessages();
  }, [])

return (
 <main className="container">
        <Header/>
        <div className="room--container">

  <div>
            {messages.map(message => (
                <div key={message.$id} className={"message--wrapper"}>
                    <div className="message--header">
                        <p>
                            {message?.username ? (
                                <span> {message?.username}</span>
                            ): (
                                'Anonymous user'
                            )}

                            <small className="message-timestamp"> {new Date(message.$createdAt).toLocaleString()}</small>
                        </p>

                        {message.$permissions.includes(`delete(\"user:${user.$id}\")`) && (
                            <Trash2 className="delete--btn" onClick={() => {deleteMessage(message.$id)}}/>

                        )}
                    </div>

                    <div className={"message--body" + (message.user_id === user.$id ? ' message--body--owner' : '')}>
                        <span>{message.body}</span>

                    </div>


                </div>
            ))}
        </div>
</div>
</main>
export default Room
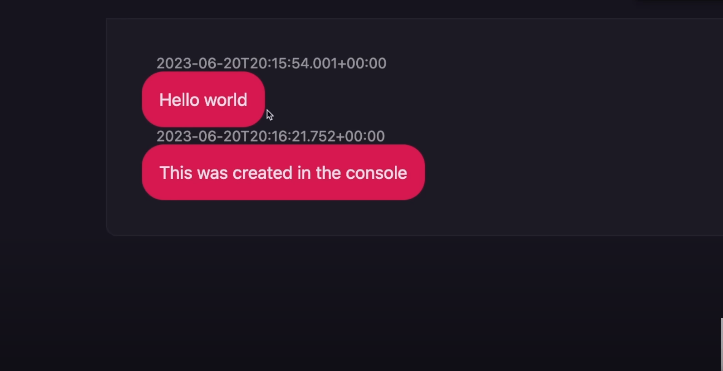
In the code snippet above, we start by importing our Appwrite configurations. Then inside our Room component, we declared a state to hold user messages. Additionally, we added another state for the input field for new messages.
To fetch messages in our database collection, we create getMessage an asynchronous function, then we call the listDocuments method and pass in our database and collection ID respectively. Then we update our state with the new data.
Create a new document in the Appwrite database collection
import { ID, Permission, Role } from "appwrite";

const Room = () => {
  const [messageBody, setMessageBody] = useState("");
  // other states

const handleSubmit = async (e) => {
    e.preventDefault();

    const permissions = [Permission.write(Role.user(user.$id))];

    const payload = {
      user_id: user.$id,
      username: user.name,
      body: messageBody,
    };

    const response = await databases.createDocument(
      databases.$id,
      databases.collection.$id,
      ID.unique(),
      payload,
      permissions
    );
    console.log("RESPONSE:", response);
    setMessageBody("");
  };

return (
<div className='container'>
// other jsx
 <form id="message--form" onSubmit={handleSubmit}>
          <div>
            <textarea
              required
              maxlength="250"
              placeholder="Say something..."
              onChange={(e) => {
                setMessageBody(e.target.value);
              }}
              value={messageBody}
            ></textarea>
          </div>

          <div className="send-btn--wrapper">
            <input className="btn btn--secondary" type="submit" value="send" />
          </div>
        </form>
</div>
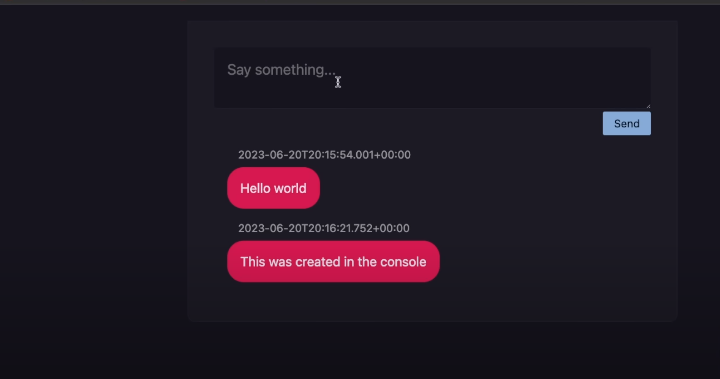
In this code snippet, we import the ID, permission, and Role classes from Appwrite. The ID class allows us to generate a unique ID for the user, while the permission class enables us to set document permissions. Furthermore, we use the Role class to assign a specific role to a document.
Additionally, we define a handle submit function that utilizes the createDocument Appwrite database method and pass our credentials.
Delete a document from the Appwrite database
What's the use of creating data if we can't destroy it? Appwrite provides a method for deleting a document from a database collection.
  const deleteMessage = async (id) => {
    await databases.deleteDocument(databases.$id, databases.collection.$id, id);
  };
Appwrite's real-time data transfer capabilities
Appwrite is known for its real-time event subscriptions. If you ever worked with socket.io, you will understand this concept.
Appwrite provides a series of real-time event subscriptions such as:
Storage event: When a new file is created or uploaded.
Authentication event: Triggers, when a new user signs up on your application.
Database event; When a new collection is created or deleted.
import client from '../appwriteConfig';

 useEffect(() => {
    getMessages();

    const unsubscribe = client.subscribe(
      `databases.${databases.$id}.collections.${databses.collection.$id}.documents`,
      (response) => {
        if (
          response.events.includes(
            "databases.*.collections.*.documents.*.create"
          )
        ) {
          console.log("A MESSAGE WAS CREATED");
          setMessages((prevState) => [response.payload, ...prevState]);
        }

        if (
          response.events.includes(
            "databases.*.collections.*.documents.*.delete"
          )
        ) {
          console.log("A MESSAGE WAS DELETED!!!");
          setMessages((prevState) =>
            prevState.filter((message) => message.$id !== response.payload.$id)
          );
        }
      }
    );

    console.log("unsubscribe:", unsubscribe);

    return () => {
      unsubscribe();
    };
  }, []);
Above, we subscribed to two real-time events - creating and deleting documents. When a new document is created, the first event fires off, allowing us to update our messages in real-time. Similarly, when a document is deleted from our database collection, another event is triggered, which updates our messages state without needing to refresh the page.
Conclusion
Appwrite is a comprehensive platform that handles all the essential backend logic required to launch a project. By leveraging its services, developers can focus solely on the frontend of their application, while Appwrite manages the backend logic, including database and storage functionalities. If you're considering migrating your backend to a BaaS, Appwrite is the perfect solution. Its setup process is straightforward, and you can get started in no time. Moreover, Appwrite is highly adaptable, built with the open-source community, and offers top-notch customer support to ensure that everything runs smoothly.